Quest'ottima guida passo passo è presa dal forum internazionale. Potete trovare qui il thread originale
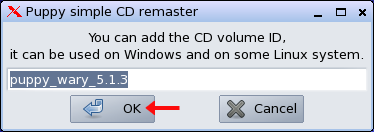
Please note that the remaster script dialog window sizes were hacked by me,
so that i could take screenshots of them that were not too big (wide) for the forum.
They will appear different on your computer, but the content is the same. (well, it will be in Wary-5.1.3)
OK then,first of all a little background information. I started with a fresh FRUGAL install of Wary-513, to which i made the following changes:
Installed both of these: zzx_upgrade_73_to_75_nokms-201101-1.pet zzx_upgrade_73_to_75_nokms_DEV-201101-1.pet
so that i could build the ATI graphics driver: ati-driver-installer-11-7-x86.x86_64.run (obviously, that required that i load up the devx and kernel source .sfs files first) Whilst i still had the devx and kernel source .sfs files loaded, i also built the wireless driver for my card: hybrid-portsrc_x86_32-v5_100_82_38.tar.gz I also installed Seamonkey-2.3.1 (after which i removed the default version) which wouldn't work until these were installed (via the PPM): dbus-1.2.4.2permissive-1-w5.pet dbus-glib-0.82-w5.pet Changed the desktop background image, by simply replacing these two files with my new image (keeping the same name and format) /usr/share/backgrounds/default.jpg /usr/share/backgrounds_original/ORIGINAL-default.jpg Changed the desktop/menu icons to Silver-Marble After all that was done, i UNLOADED the devx and kernel source .sfs files, then rebooted. If this step was not done, then the final remaster would be somewhat bigger than necessary.
OK, now that i am back at the desktop i need to do a couple more things before running the remaster script. To make things easier for when i make an install (on this computer) from the remaster i am about to make, i will make a backup copy of my current xorg.conf file. So i simply went to: /etc/X11 and copied xorg.conf as acer-ati_xorg.conf Right then, that's enough of what i did in the way of customising, let's get down to the nitty gritty of remastering.
Before we really get going, let's make sure we have everything we need.
1. A working area with enough free space (here i am using another partition sda8) this needs to be mounted before running the remaster script. so you may as well do it now.
NOTE: The working area needs to be on a Linux Partition (ext2, ext3 etc)
DO NOT use FAT or NTFS partitions.
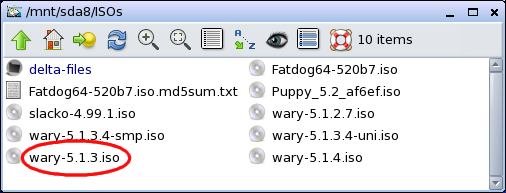
If you have enough space in /mnt/home you can use that instead, there is no need to mount it as it already is (or should be if you are running a FRUGAL install) 2. A copy of the LiveCD you used to make your install (or at least the ISO image) If using the LiveCD, put it into the drive now. If using an ISO image, then mount it now (see Step 2)
Step 1.
If you intend for your new Puppy to run the usual setup for locale and timezone (i did), then before running the remaster script navigate to: /usr/lib/locale
Copy the contents of this directory to somewhere else (say: /root/my-documents)
After we have finished remastering, we need to copy them back to /usr/lib/locale
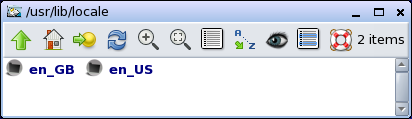
/usr/lib/locale should now look like this.
NOTE: If you are remastering some version of Lupu, then i suggest that you take a look at this thread: Remastering Lucid Puppy 5.2.5
as it explains about the differences between the normal Puppy way of doing things and the Lupu way.
Step 2.
If you are using an ISO image rather than a LiveCD, then it needs to be mounted now, navigate to it and left click on it.
Here you can see it mounted

You can close these two windows if you like, it will give more room to play on the desktop ![]()
Step 3.
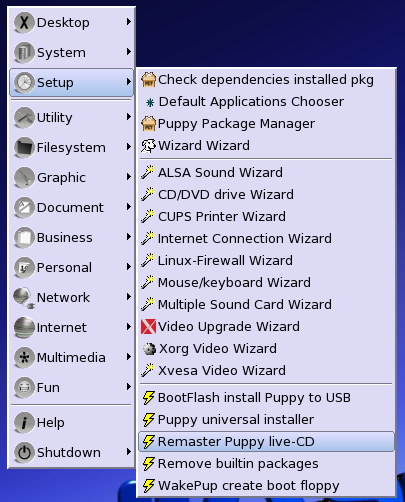
Here we go, start the remaster script.
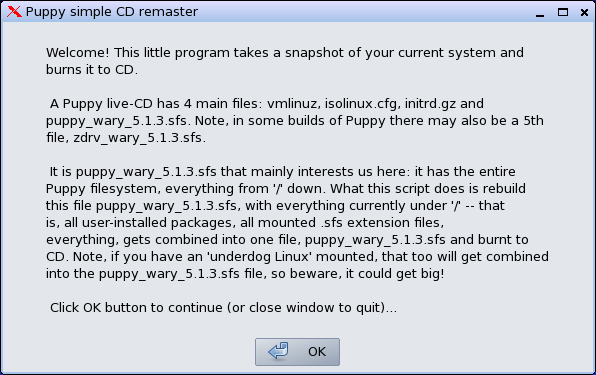
Step 4.
Have a read, then click OK
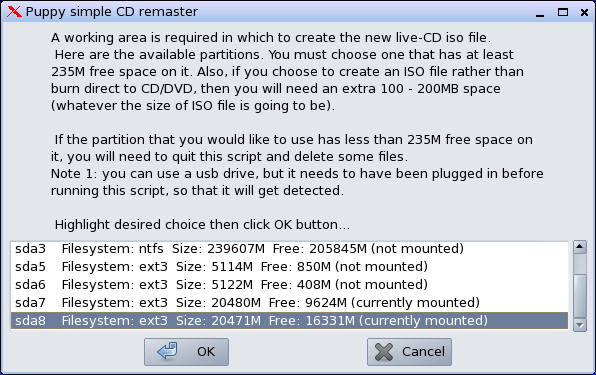
Select your working area.
As i mentioned before i used another partition (sda8) you can see that it is mounted already, you can also see that sda7 is mounted too, that is my /mnt/home.
Select your choice then click OK
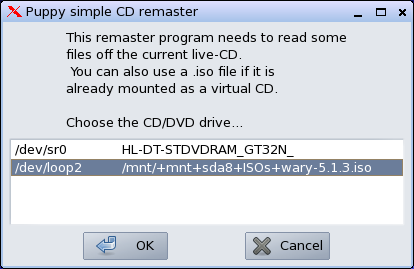
As you can see from the image below, i used an ISO image rather than the LiveCD,again, select your choice and click OK
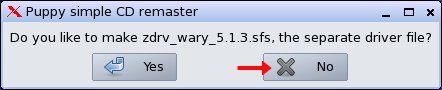
Here you have a choice.
You can create a seperate driver .sfs file, or have it included in the main Puppy .sfs
I opted for the latter.
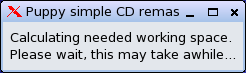
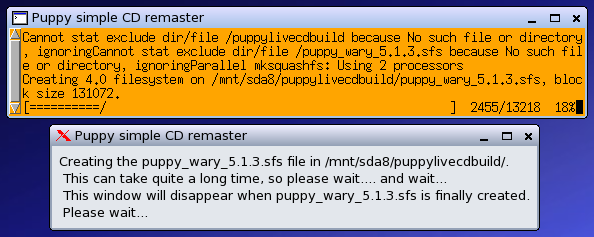
Depending on how much you have installed into your FRUGAL install,
this step will take a minute or two.
I'm not sure what it is complaining about in the orange window, but it didn't appear to cause any problems.
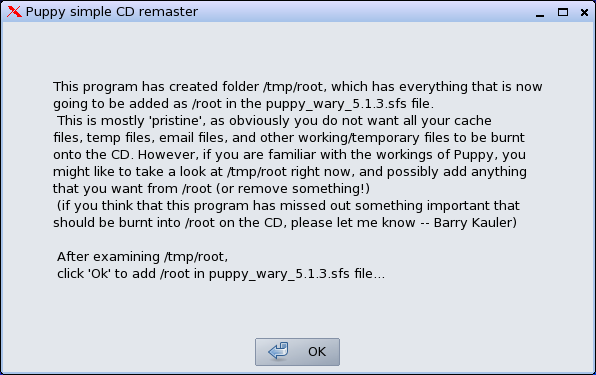
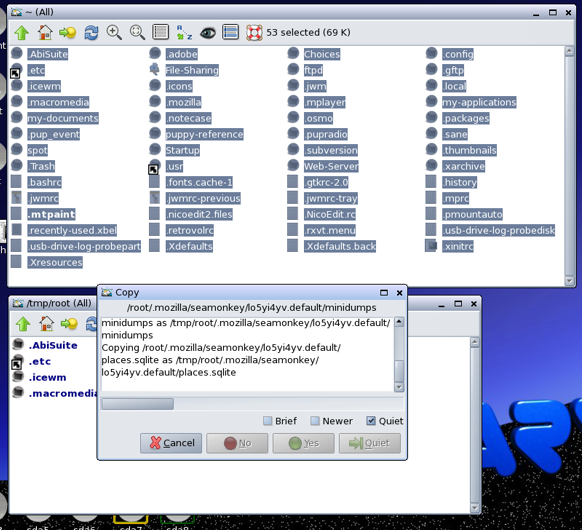
Step 5.
This is a very important step.
DO NOT click OK just yet (minimize the window into the taskbar after reading what it has to say)
Open up two ROX-Filer windows.
One at: /root (the top one in the image below) and the other at: /tmp/root
Make sure Hidden files are being shown (in both windows)
Position the windows similar to what is shown in the image below.
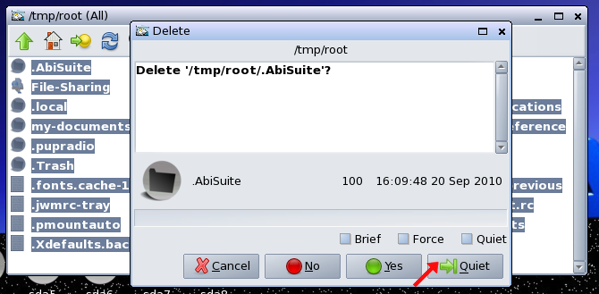
Click the icon to select ALL files in the window at: /tmp/root

Now right click on one of the files, and select Delete from the popup menu, in the window that appears, click on the Quiet button.
This will delete everything in /tmp/root
Now go to the window at: /root
and click the icon to selct ALL files.
Now left click (and keep the mouse button held down) on one of the files, then Drag 'n' Drop it into the other window at: /tmp/root.
Select COPY from the popup menu that appears.
When all of the files are finished being copied, go in to /tmp/root/my-documents and delete the locale files that you copied there in Step 1.
There is no need for them in the remaster.
Bring the remaster GUI back up out of the taskbar, and click OK
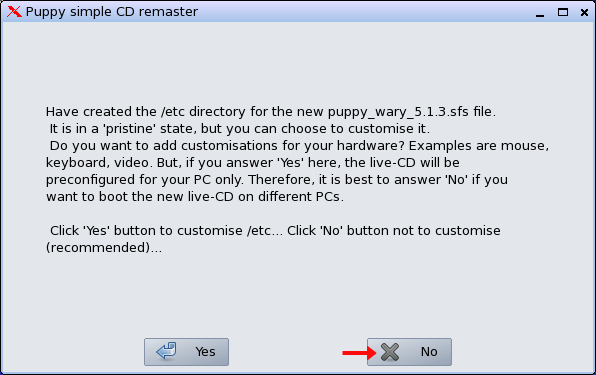
Step 6.
I did not want to add any customisations for my hardware,
as i would like to use the new remastered ISO image on different computers.
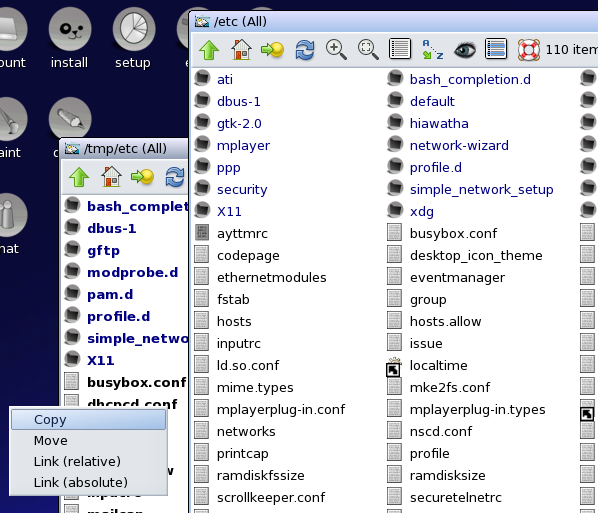
Step 7.
This is another very important step.
DO NOT click OK just yet (minimize the window into the taskbar after reading what it has to say)

This particular step is rather more selective than what we did in Step 5
Although i did not want to add any customisations for my hardware,
there are a few things that i wish to copy over into the remaster.
You may or may not have to copy things from /etc
it all depends on what packages you installed.
One way to find out, is to take a look in: /root/.packages
Let's say you installed a package called: cannot-live-without-it.pet
then you would find a file called: cannot-live-without-it.files
If you open that in a text-editor you will see all of the files that package installed (and where),
so, if it did put something in /etc, you may need to copy it into the remaster
So, once again
Open up two ROX-Filer windows.
One at: /etc
and the other at: /tmp/etc
Make sure Hidden files are being shown (in both windows)
Position the windows so that both are visible (for Drag 'n' Dropping)
These are the things i wanted copied over:
/etc/ati
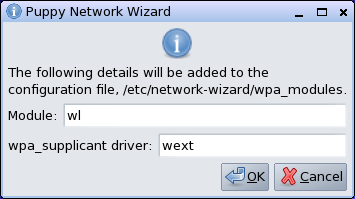
/etc/network-wizard/wpa_modules
/etc/X11/acer-ati_xorg.conf
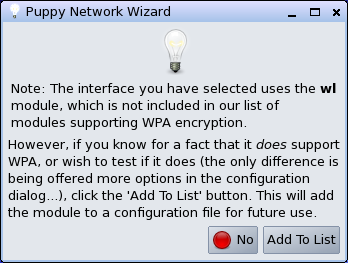
In the previous step, if i did not copy over /etc/network-wizard/wpa_modules
i would get the following two dialog windows appear after clicking on the Wireless button in the Network Wizard when running from the new remastered ISO
Step 8.
Here you get the chance to edit the isolinux.cfg file,
i chose to leave it as it was.
Step 9.
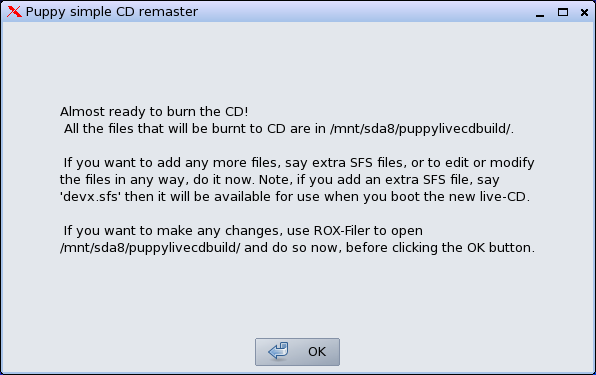
Here you get the chance to add or edit things before the ISO is created,
again, i left things as they are and click OK
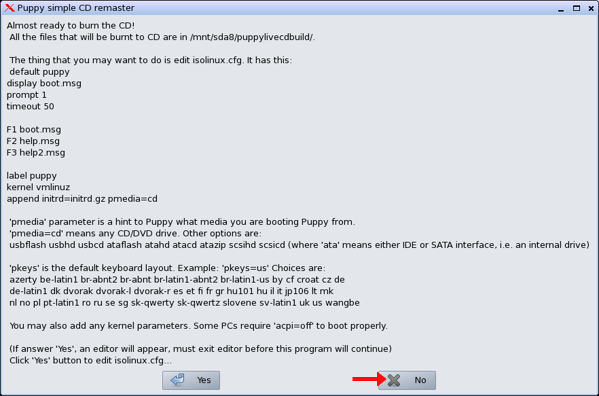
Step 10.
Here you can choose to burn the ISO directly to CD/DVD,
or simply create the ISO image (i opted for the latter)
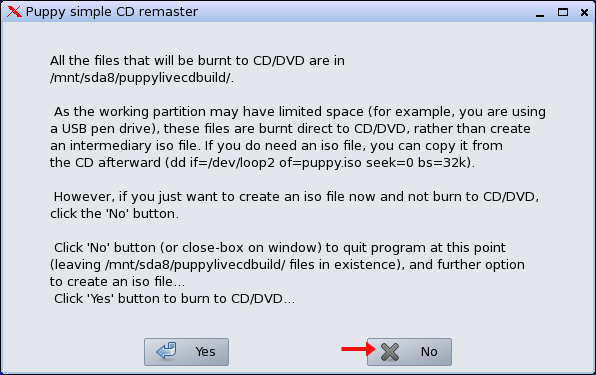
Step 11.
Your last chance to create the ISO.
Note: Even if you choose to create the ISO (as i did) the files are still left in existence.

Step 12.
I simply left things as they were, and clicked OK
Step 13.
Here you see the ISO being created (it don't take long)

Step 14.
There you have it, job done.

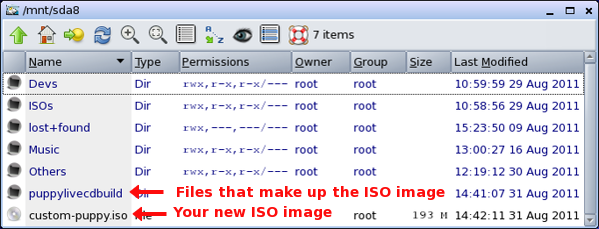
Step 15.
Here you can see both the new ISO image,
and the directory containing the files that make up the ISO
Wake Up Call
Remember what we did in Step 1.
![]()
Go and copy them back to /usr/lib/locale
BEFORE you shutdown or reboot whatever.
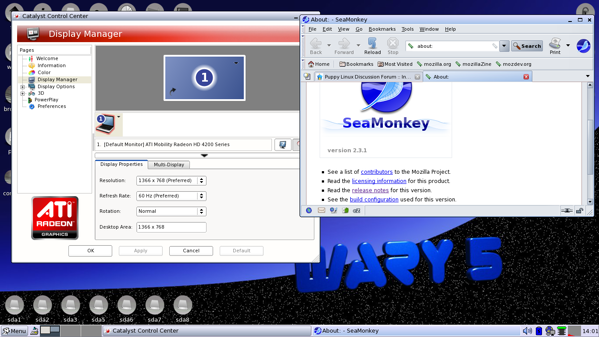
Here are a couple of screenshots taken in the new remaster running in RAM
In this one you can see the desktop background and icons are as i expected
and after overwriting the xorg.conf with my backed up one acer-ati_xorg.conf, the ATI Catalyst Control Center and the newer Seamonkey.
You may also notice that i have setup the wireless connection already.
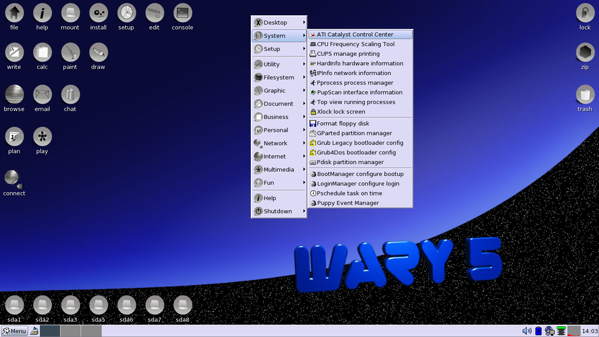
This one shows that the menu entries are still intact (ATI CCC)
I hope this helps
CatDude